UPDATE. 7/31/2022. I have updated my process due to the BLM utilizing new software. Some information is still relevant, but check out that new blog post first.
I try to keep a pulse on the mining claims in the areas I dig and I keep a prospecting map with me to help understand where I can and cannot look for crystals. I’ve met folks that are really fair when they find someone digging on their claim; and I’ve also met folks that were really angry. Note that taking crystals off of someone else’s claim without prior written permission is theft, and you can be arrested and prosecuted by the County Sheriff.
Although claims are supposed to be well marked–here in Colorado with 6 posts–you may not see the posts easily or the posts may be down or missing. It’s not very fun wandering around all day looking for corner posts to know if you can dig in the spot you found; so save yourself the time and energy and build yourself a prospecting map!
I recently updated and created a couple prospecting maps of areas I frequent and thought I’d share some map creation tips as it is a fairly simple process and all the work can be done from the privacy of your own home. As an example of the level of effort required, one area I mapped had about 25 claims and it took about 4 hours total to produce a prospecting map; and now that I’ve created a streamlined process (which I’m sharing with you), it will take considerably less effort next time!
The process I use consists of a few steps, all which can be done in the comfort of your home:
- Go to the BLM website and use their interactive 100K map to identify the claims in the area you are interested in
- Take notes on the relevant claim information in your prospecting area
- Email the BLM office with the claims you need further detail on and pay for scanned copies
- Go through the Location Certificates and transfer the claims’ boundaries to your prospecting map
Using the BLM website’s Interactive Map to find Mining Claims
NOTE: You can click on any image to view it enlarged.
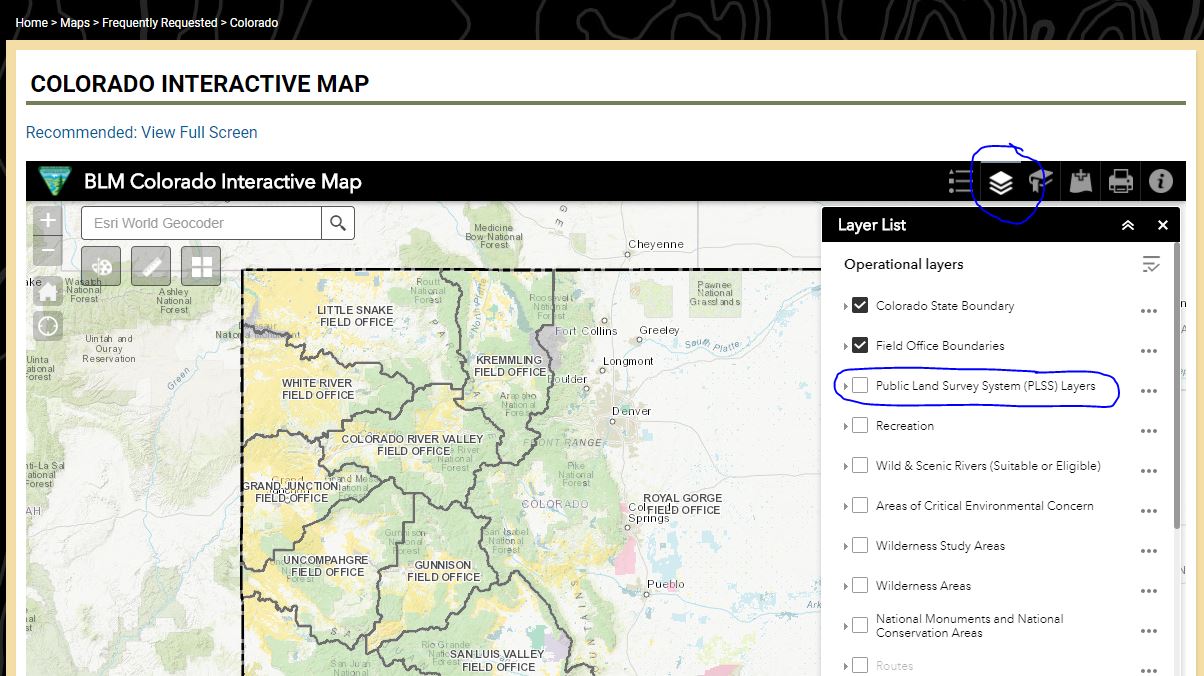
Here is the link for the BLM Colorado Interactive Map (https://www.blm.gov/maps/frequently-requested/colorado/gis-datasets) that you will be using. For other states, search the BLM website at blm.gov. The first thing I do is turn on the layers helpful in displaying mining claims (these will overlay on top of the existing map). You may find yourself turning these on and off as you interact with the map and application; play with it and use the application as it is most ergonomic for you.
Use the “Stacked Papers” icon (located in the upper right corner of the map) to bring up the Layer List controls and choose these two options: Public Land Survey System (PLSS) and the Active Mining Claims (you’ll need to scroll down through the list). When done choosing your layers you can click the “Stacked Papers” icon again to close the Layer List. Toggle as necessary.
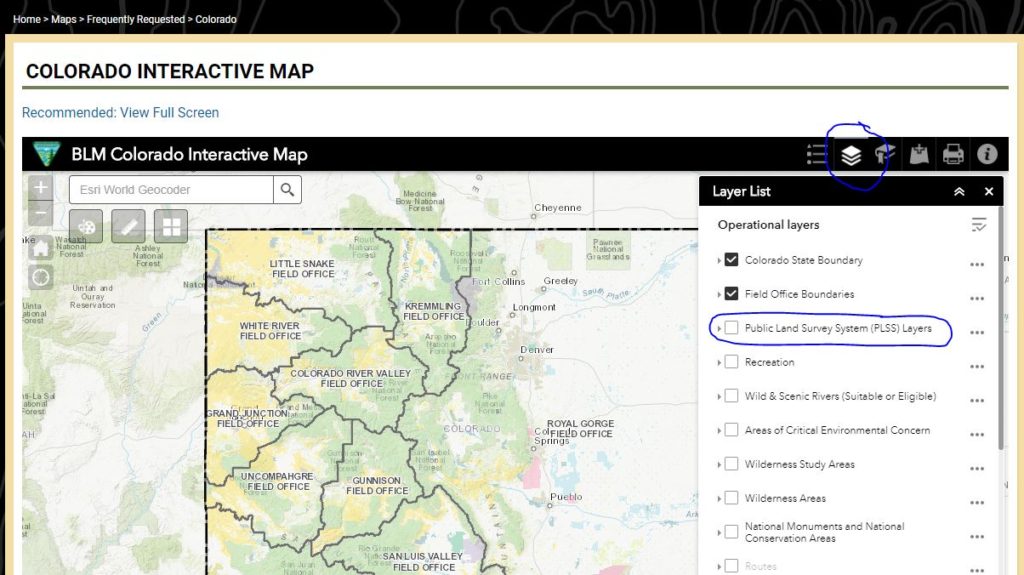
The next step is to drill into the area you want to investigate. I found that this workflow worked the best for me: 1) Turn on Active Mining Claims layer, 2) drill into the map to the area of interest then 3) Turn on the PLSS layer and finally 4) Hide the Layer List. This is just what I preferred, choose whatever works best for you!
Let’s look at Devils Head as it is a popular spot due to its proximity to Denver and Colorado Springs. Devils Head is just west of Larkspur in the center of the state, so I found Larkspur on the map and started to click that area to zoom in. Assuming you have Active Mining Claims layer active, as you drill in you will start to see a pink boxed area surrounded by green on the overlays. The pink area is the Active Mining Claims layer. Let’s drill into the Virgin’s Bath locality. You may want to remove the Active Mining Claims layer while you drill in and then turn it back on so you can use the switchback in the road as a reference point that is obscured by the pink layer.
Understanding the Public Land Survey System as it relates to Mining Claims
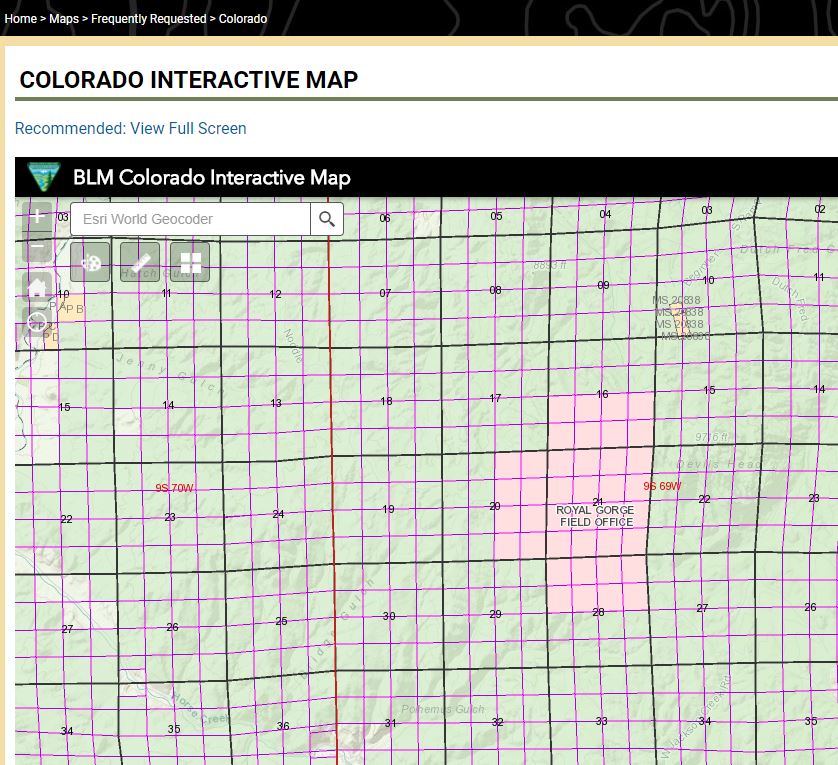
Before moving forward, it is important to understand in general the implementation of the Public Land Survey System (PLSS). At the foundation of this survey framework there is a single initiation point for the survey; the east/west line going through this point is termed the Baseline, the north/south line is the Principle Meridian. The entire survey “coordinates” are relative to this initial survey point and two lines.
A Township is a 36 square mile area (6 x 6 mile) box of land on the map and is referenced North or South of the Baseline. A Range is a vertical column of Townships that is referenced East or West of the Principle Meridian line. So in our forthcoming example of Devils Head, the Township/Range is T9S R70W, meaning 9 Townships south of the established Baseline, and 70 Townships west of the established Principle Meridian line.
Townships are further divided into 36 Sections (each a mile square). A combination of Township, Range and Section will take you to any square mile of land that has been surveyed using the PLSS framework. Finally, to get to the scale that Mining Claims are relevant within, a Section is subdivided into four quarter-Sections, each 1/4 mile, or 160 acres; these are referred to Section # and NE, NW, SE or SW.
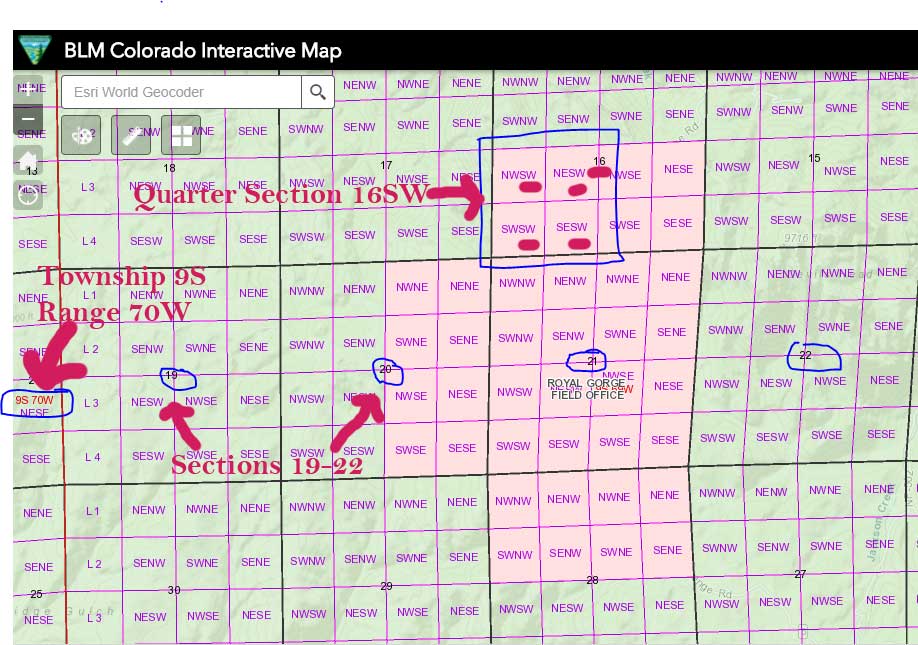
Claims are documented at the quarter-Section scale and everything you will be doing with your prospecting map should be consistent with this scale. Each claim’s Certificate of Location (COL) documentation will be referencing the quarter-section(s) they reside within. So for our example, the Devils Head Virgin Bath locality, we’re interested in mining claims within the Township 9S, Range 70W and Sections 16, 20, 21, and 28 and the associated quarter-Sections. Refer to the screen capture below to see all these coordinates on the map. This PLSS layer on the BLM Interactive Map, if you zoom in far enough, breaks quarter sections into another 4 quarters; but claims do not go to that level of detail (thankfully, its already complex enough!).
Researching which claims are in a quarter-Section
To get information for all the claims in the this locality, we’ll need to examine all the quarter-Sections in pink; in this case 10 total quarter-Sections. For this example, we’ll use the quarter section 16SW and for each of the other nine quarter-Sections you will follow the same process.
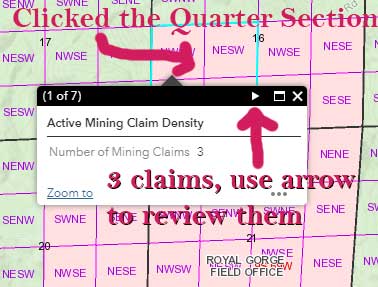
As shown above, clicking anywhere in the quarter-Section will trigger a pop-up box detailing all the layer information (in this case Active Mining Claims) you’ve selected. You’ll use the back and forth triangle controls in this box to advance through all the information on the Active Mining Claims within this quarter-Section. I write down the CMC Case Number and Claim Name for each of the claims I require further detail for.

It is important at this point to note that we are looking at 160 acre quarter-Sections. Lode claims are typically 20 acres or less, so you cannot find the exact location of the claim using this interactive map! There is only one way to find the exact boundaries of claims, which is through the Certificate of Location (COL) document, detailed below.
Continue with this process throughout all the quarter-Sections in your prospecting area and write down all the CMC#s and associated Claim Names. This will give you all the information you need to request the Certificate of Location documentation from the BLM or County Recorder’s offices.
Knowing a little bit about the filing process of a claim may help at this point. The process of filing a claim says to file with the County Recorder’s Office first, then file with the BLM Office. The BLM Office is what assigns the claim case number (CMC#), and often the COL document at the county lacks the CMC#, but does have the required claim name and the quarter-Section survey information. I have another blog post that describes getting information from the County Recorder’s Office. The official COL document is stored at the BLM office, so read on for the simple process of gathering this information from the BLM.
Acquiring the Certificates of Location from the BLM Office
You can get the claim’s Location Certificate from the BLM office by either visiting the office or by email. If you visit the office they can make paper photocopies of the COL (Certificate of Location) which is cheaper than scanning (both will cost you an nominal amount, photocopies were $0.15 per page, scans $0.30 per page–January 2018 prices). You could also take pictures with your phone or camera of these documents for free, assuming you are physically at the BLM office. If you do the email route your only choice is obtaining the COL in electronic PDF format.
Here is what you do…
Send an email to CODOCKET@BLM.GOV, note that this is the email address specifically for the Colorado Office; inquire with the BLM by phone if you are researching somewhere else. In the subject say you are requesting Mining Claim COL information. In the email be sure to include your phone number so they can call you for credit card information–best practice is to not email your payment information. Then include all the CMC#s and Claim Name information you are looking for and ask for the Certificate of Location document.
I found it was helpful to tell them I was creating a prospecting map so they know exactly what I was doing and they can ensure I got all the proper information. Some of the maps I discovered in the COL document are beyond confusing–how people can file this way I don’t know–but the staff at the BLM office helped me by providing additional information for these couple of confusing cases because I told them my purpose.
I submitted my email inquiry on a Friday morning and I received my email of COL PDF attachments the following Monday, so super-quick turn-around in my opinion! I don’t know if they have a standard turnaround time guarantee, I suppose it depends on how busy they are, vacation schedules, etc; you may ask them expected turnaround time in your email if you are in a hurry.
Creating your Prospecting Map
When you receive the scans from the BLM Office (or from the County Recorder’s office), you then can transpose the claim boundaries from the Certificate of Location (COL) document into your prospecting map. This takes a little time as each person filing the claim may have surveyed their claim and submitted their map a little differently. They key to make this an easy process is to ensure your destination map has PLSS survey points on it.
Preparing your Maps
If you are using Google Earth as your prospecting map, there is a PLSS overlay available and you may find that helpful; here are the BLM’s instructions for using it. I use both Google Maps and paper topo maps to generate my prospecting maps, and neither has PLSS coordinate systems. So to simplify this process I had to add PLSS coordinates onto my maps before I started. Here is how i did it.
I opened up the BLM Colorado Interactive Map with only the PLSS layer turned on and found a point where a road (could be a stream, a valley, etc) intersected with the PLSS quarter-Section corner. I then found and marked that quarter-Section point on my maps–my paper topo map with a pen “dot” and my Google Maps with a marker. Knowing that a section is a mile on each side, and thus a quarter-Section is a 1/4-mile, I used a ruler on the paper map to create coordinate “dots” at 1/4-mile increments North/South and East/West of my original point. I now had a quarter-Section PLSS coordinate system on my paper map. On Google Maps, I did the same, except using their distance tool and markers. It took me a while to figure this out but it sped up the process significantly having PLSS on all maps!
Another tip, I felt I needed to make some decisions on the accuracy required for my prospecting map. This is a personal preference decision. I figured I need to know a general claim boundary on my prospecting map, not the exact corner post spots. In the field, if I’m close to a claim on my map and I want to prospect, then I’ll search for the corner posts to ensure I’m not trespassing. The purpose of my map is to generally plan where I intend to prospect.
Transposing the COL claim boundaries to your prospecting maps
I learned this from experience, so here’s another tip to think about before you start. At first I added claim boundaries in the CMC# order; which is how they defaulted when I saved them in my folder. I was bouncing all over my map which I found slow and tedious. I found it much quicker and more accurate to pull up the trusty BLM Interactive Map again and loop through each claim a quarter-Section at a time. I’d open and plot the COL’s by location rather than its number. This let me get familiar with each quarter-Section of the map and plotted all claim boundaries for that area of the map before moving to the next quarter-Section. It also helped when claims spanned quarter-Sections.
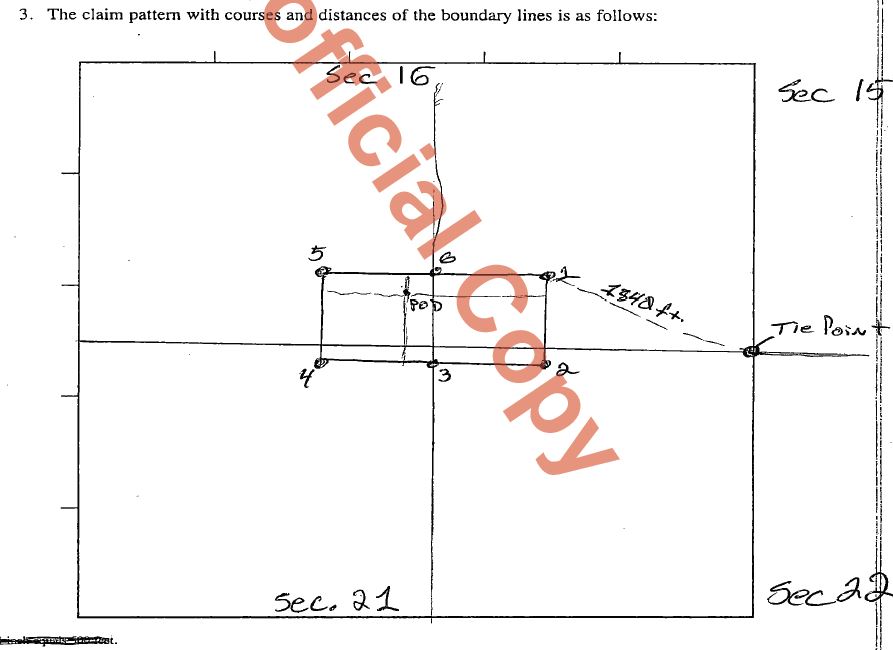
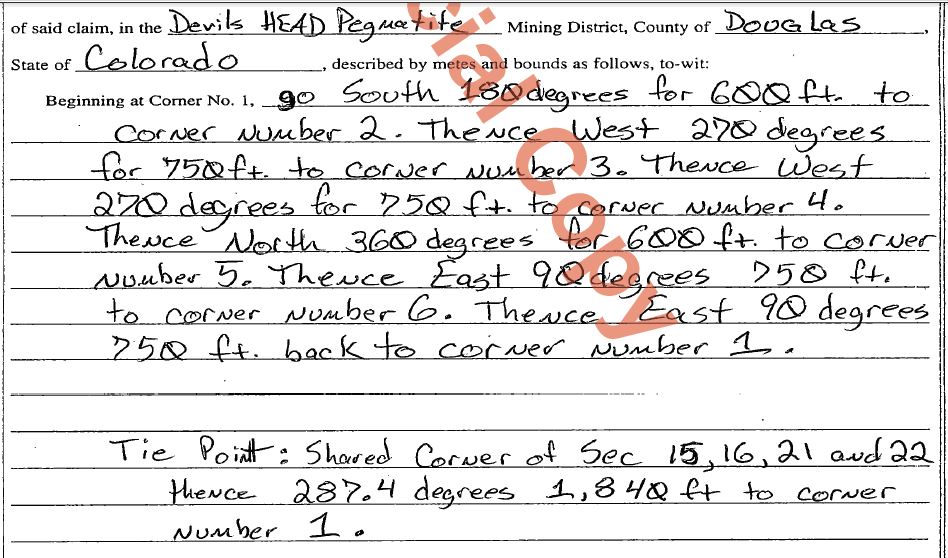
The standard way claims are surveyed is to first start with a known “tie point”, which by convention should always be something of the known PLSS survey framework, i.e. a corner point of a quarter-Section. Then you use a measurement of degrees and distance from that tie point to one of the claim corners which is known as the claim’s corner point #1. Then you further describe the outline of your claim in words, and also on a quarter-Section map. Typically lode claims are 20 acres with dimensions of a 1500 feet by 600 feet in a parallelogram (typically rectangle); but the claim’s area can be smaller or it can be diagonal so ensure you read the description and look at their map.
Using your Prospecting Map
Now you have a map you can take with you and help guide you in the field. Note that the claimant is required to plant 6 corner/side posts securely in the ground to clearly mark the boundaries of their claim. Sometimes the claim owner will neglect to do this, or vandals remove the posts, or the posts simply fall down for whatever reasons. Regardless, it is the rock hound’s responsibility to know the claims in the area they are prospecting and to not mineral trespass on those claims. But no worries because you have a prospecting map!
One other consideration is that new claims are filed all the time, there is processing time at the BLM, and claims are periodically closed. Unfortunately, as soon as you have created a prospecting map is it is likely outdated. How I deal with this is the night before I head out prospecting, I dive into the BLM’s Interactive Map and verify the claims filed are the ones I have on my map–if there are changes I note this on my map. When I’m prospecting I also keep an keen eye on the landscape looking for posts; even if it is a place I recently have been, things could have changed since the last time I was there. Finally, I update my prospecting maps several times a year and grab the new COLs using the outlined process above.
Good luck out there!
Awesome write up!
I just(so far) have one question… In your example(which just happens to be the first prospecting map I’m putting together) you have the township/range as 9s 70w, I’m probably missing something but should it be 9S 69W?
Thanks for all the info!
– AV